How to Fix Blurry Streams, Buffering, and Frame Drops in TikTok LIVE Studio
2026-03-07
How to Fix Blurry Streams, Buffering, and Frame Drops in TikTok LIVE Studio
When a stream looks soft, starts buffering, or begins dropping frames, creators often change several settings at once and accidentally make the issue harder to diagnose. A better approach is to separate the problem into three categories: picture quality, delivery stability, and system performance.
TikTok LIVE Studio gives you most of the key controls in one place, but the fix depends on choosing settings that match your actual computer and upload conditions.
The fastest way to solve these problems is not to change everything. It is to identify which symptom is most trustworthy first, then make one meaningful adjustment at a time.
Identify the Problem Before You Change Settings
"Blurry" is not always the same problem as "buffering," and "frame drops" are not always caused by the internet.
A quick way to classify the issue:
Blurry video: the stream is visible but lacks detailBuffering: the stream pauses or becomes unstable for viewersFrame drops: motion becomes choppy or uneven
This matters because each symptom points to a different area first. If you diagnose the symptom clearly, you waste less time.
A common mistake is treating every quality problem like a bitrate problem. Sometimes the stream is blurry because resolution is too low. Sometimes it buffers because upload is unstable. Sometimes frames drop because the computer is overloaded. The correct fix depends on the first symptom you trust most.
A useful first question is: who is seeing the problem?
- if you see the issue inside the stream tool itself, suspect settings or system load first
- if your local preview looks fine but viewers complain, suspect delivery stability first
- if motion feels uneven during action-heavy content, suspect FPS or hardware load first
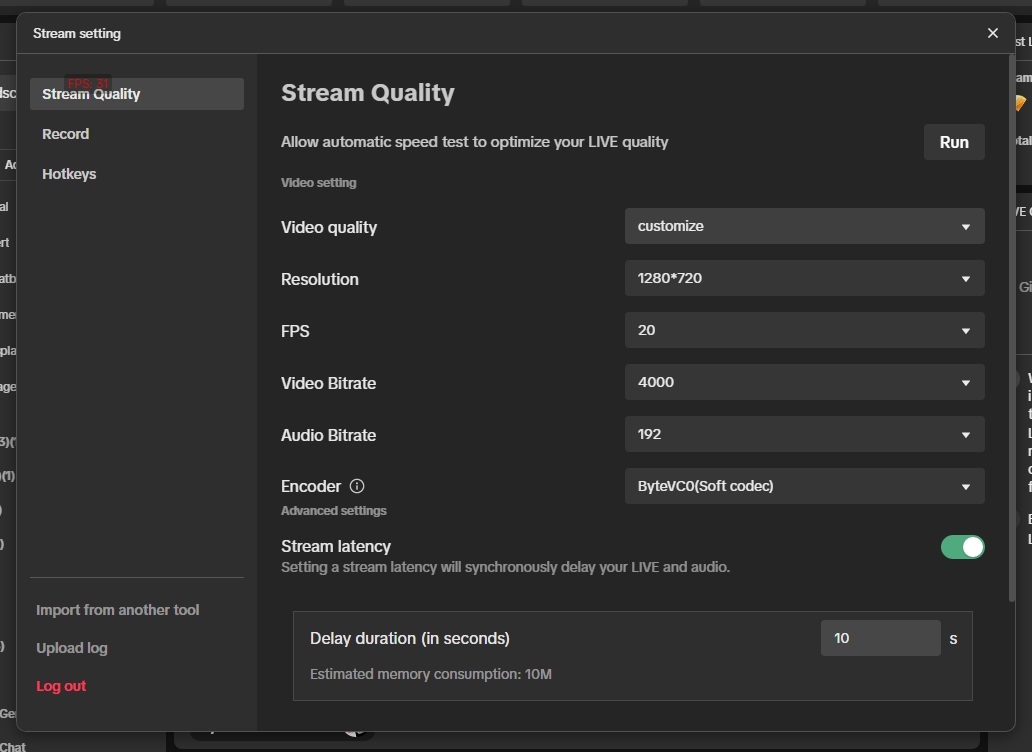
Start with the Stream Quality Panel
The stream quality panel is where the most important decisions live:
- resolution
- FPS
- video bitrate
- audio bitrate
- encoder
- latency behavior
Start here because these settings determine how hard the system has to work and how much data your connection has to push consistently. If they are too aggressive for your setup, the stream can look unstable even when the camera itself is fine.
The screenshot matters because it shows all the major control points in one place. That means this is your first troubleshooting stop, not your last. Before you change hardware, rebuild scenes, or blame the platform, check whether the stream settings actually match the setup in front of you.
A practical order inside this panel is:
- Check resolution and FPS first.
- Check bitrate next.
- Check encoder choice after that.
- Touch latency only if you have a reason to change the delivery behavior.
Match Resolution FPS and Bitrate to Your Real Setup
A common mistake is choosing settings based on what sounds best instead of what the computer and network can actually sustain.
In practice:
- lower resolution can improve stability when hardware is limited
- lower FPS can reduce processing load
- bitrate should match real upload headroom, not theoretical peak speed
- encoder choice should reflect whether your machine handles software or hardware encoding better
If you are unsure, reduce one major variable at a time. For example, lowering resolution or FPS first often reveals whether the system was overloaded. If the picture becomes stable immediately, the earlier settings were likely too ambitious.
A good judgment rule is:
- if motion is the problem, check FPS and processing load first
- if sharpness is the problem, check resolution and bitrate first
- if the stream looks fine locally but not for viewers, check the network path first
Avoid changing three settings at once. That makes the result harder to read.
One simple pattern works well:
- if the stream looks soft but stable, try fixing sharpness-related settings first
- if the stream looks sharp but unstable, try fixing load or delivery first
Fix Buffering by Checking Upload Stability
Buffering often points to upload inconsistency rather than visual settings alone.
Useful checks include:
- whether the upload speed remains steady, not just high in a one-time test
- whether other apps or devices are consuming bandwidth
- whether the bitrate leaves enough safety margin
- whether the stream is more stable after reducing bitrate modestly
If the stream looks fine locally but viewers experience pauses, the delivery path is a stronger suspect than the camera or scene design.
A common mistake is setting bitrate too close to peak upload speed. Real-world stability matters more than theoretical speed. If your connection fluctuates, a slightly lower bitrate often produces a better viewer experience than a higher bitrate that cannot stay stable.
Another mistake is assuming one successful speed test proves the stream will stay stable for the whole session. Streaming is continuous, so consistency matters more than a single good result.
Reduce Frame Drops from System Overload
Frame drops usually mean the computer is struggling to render, encode, or process the stream in real time.
Common reasons include:
- high resolution plus high FPS
- too many active sources and effects
- demanding camera filters or extra processing
- background applications competing for CPU or GPU resources
The most practical fixes are often simple:
- close unnecessary apps
- lower scene complexity
- reduce FPS before raising it again later
- use an encoder setting that suits the machine better
The goal is not maximum settings. The goal is a stable viewer experience.
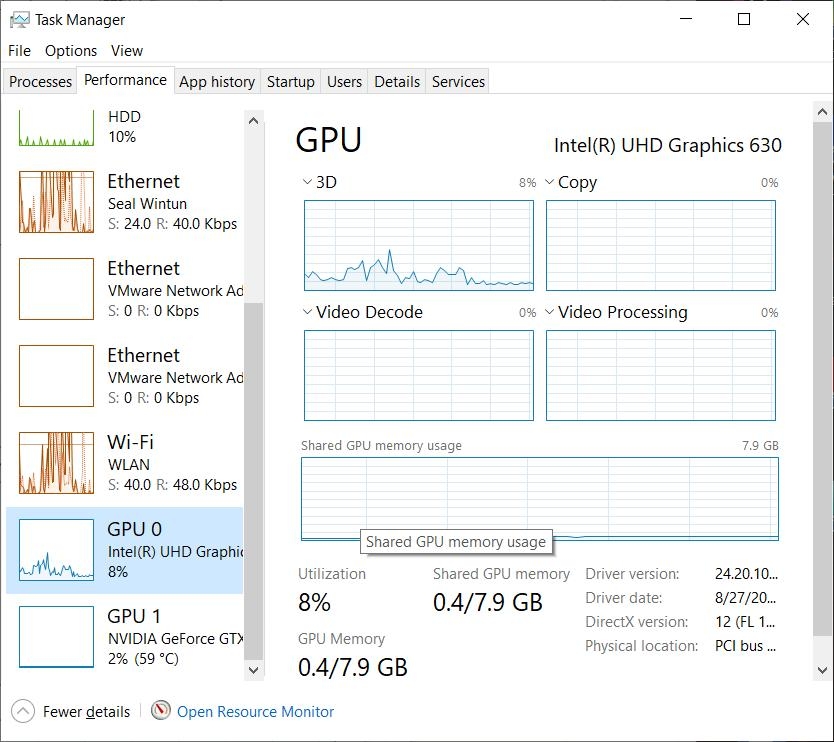
The extra performance image matters because it reinforces a useful troubleshooting habit: check whether the machine is under real pressure before assuming the platform is at fault. If GPU or system load spikes while the stream becomes unstable, that is a strong clue that your setup is asking too much from the computer.
One useful test is to simplify the stream temporarily. If reducing scene complexity or background load immediately improves stability, the system was likely overloaded rather than the network being the main issue.
This is also the right time to look for hidden load sources:
- browser tabs with video playback
- games or apps still running in the background
- heavy camera filters
- layered scenes with too many active elements
A Simple Troubleshooting Order That Saves Time
A good troubleshooting order looks like this:
- Confirm whether the issue is blur, buffering, or dropped frames.
- Check stream quality settings first.
- Reduce one major load variable at a time.
- Check upload stability if viewers still report interruptions.
- Simplify scenes or close background apps if frame drops continue.
This order works because it avoids random tuning. You are always testing one likely cause at a time.
Common mistakes to avoid:
- raising bitrate before confirming upload stability
- blaming the network when the computer is clearly overloaded
- lowering everything at once and learning nothing from the result
- ignoring the difference between what you see locally and what viewers report
Summary
Most TikTok LIVE Studio video issues come from mismatch, not mystery. Resolution, FPS, bitrate, encoder choice, and upload stability all need to fit the real limits of your setup. Once they do, blurry output, buffering, and frame drops usually become much easier to control.
If the picture is stable but the sound is still noisy, muted, or inconsistent, the next thing to fix is the audio chain.