How to Build a Dual Camera Setup and Use a Phone Camera in TikTok LIVE Studio
2026-03-07
How to Build a Dual Camera Setup and Use a Phone Camera in TikTok LIVE Studio
A second camera angle is one of the fastest ways to make a desktop stream feel more polished. It helps when you want to show your face and your desk at the same time, cut to a close-up during a product demo, or keep a separate top-down shot ready for tutorials and unboxings.
TikTok LIVE Studio already gives you the pieces you need: scenes, camera sources, and phone camera support. The real job is organizing them so your stream stays easy to control.
Why a Dual Camera Setup Matters
A single camera is enough to start, but it can become limiting once your content includes demonstrations, tabletop work, product details, or reaction moments. A second angle lets you switch context without breaking the stream rhythm.
For example, your main camera can stay on your face while the second camera focuses on:
- an overhead desk view
- a side angle for hands-on work
- a product close-up
- a vertical phone-style angle for certain visual segments
Even when the technical setup is simple, the viewer experience feels more intentional because you are matching the camera to the moment.
What You Need Before You Start
The easiest version of this setup uses one stable main camera and one secondary source. That second source can be another webcam, a capture-card-connected camera, or a phone camera.
Before building scenes, make sure:
- both devices are recognized reliably by the computer
- each camera has a fixed physical position
- the lighting looks reasonably similar across angles
- the framing of each shot has a clear purpose
If you are using a phone camera, treat it like a dedicated shot rather than something you constantly pick up and move around. The more stable the framing is, the easier your stream will be to run.
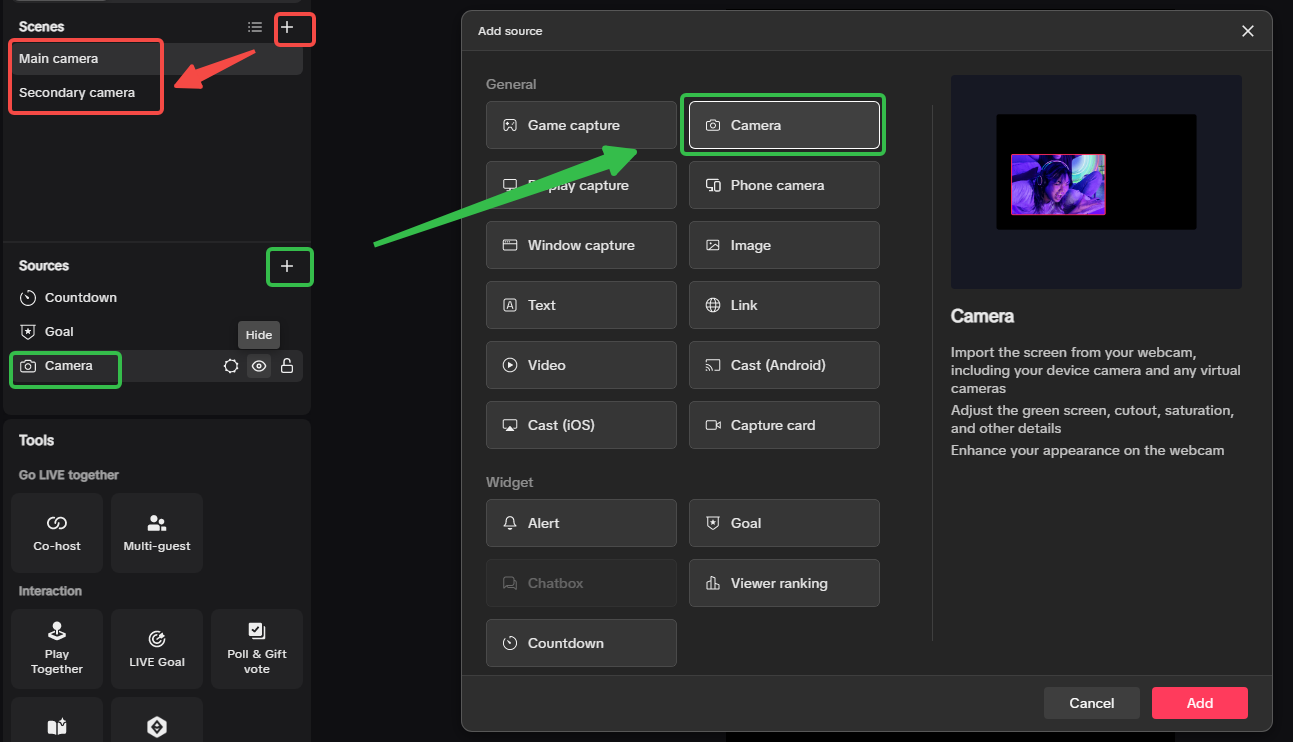
How to Add a Second Camera Scene
The cleanest beginner method is to create separate scenes instead of squeezing everything into one layout. A common structure is:
Main camerascene for the regular talking shotSecondary camerascene for overhead or close-up work
This makes switching easier because each scene only needs one clear role. In practice:
- Create a new scene for the second angle.
- Add a camera source inside that scene.
- Name the scene clearly so you can recognize it instantly while live.
- Check framing before relying on it during the stream.
For most tutorial, desk-demo, and product-detail streams, separate scenes are the better default because the viewer always knows which angle is primary. A combined layout is still useful, but usually only when both views need to stay visible at the same time, such as a reaction shot plus a game feed or a face cam plus a persistent overhead view.
If you are not sure which approach to choose, start with two independent scenes first. It is easier to add a picture-in-picture layout later than to untangle a crowded layout during a live session.
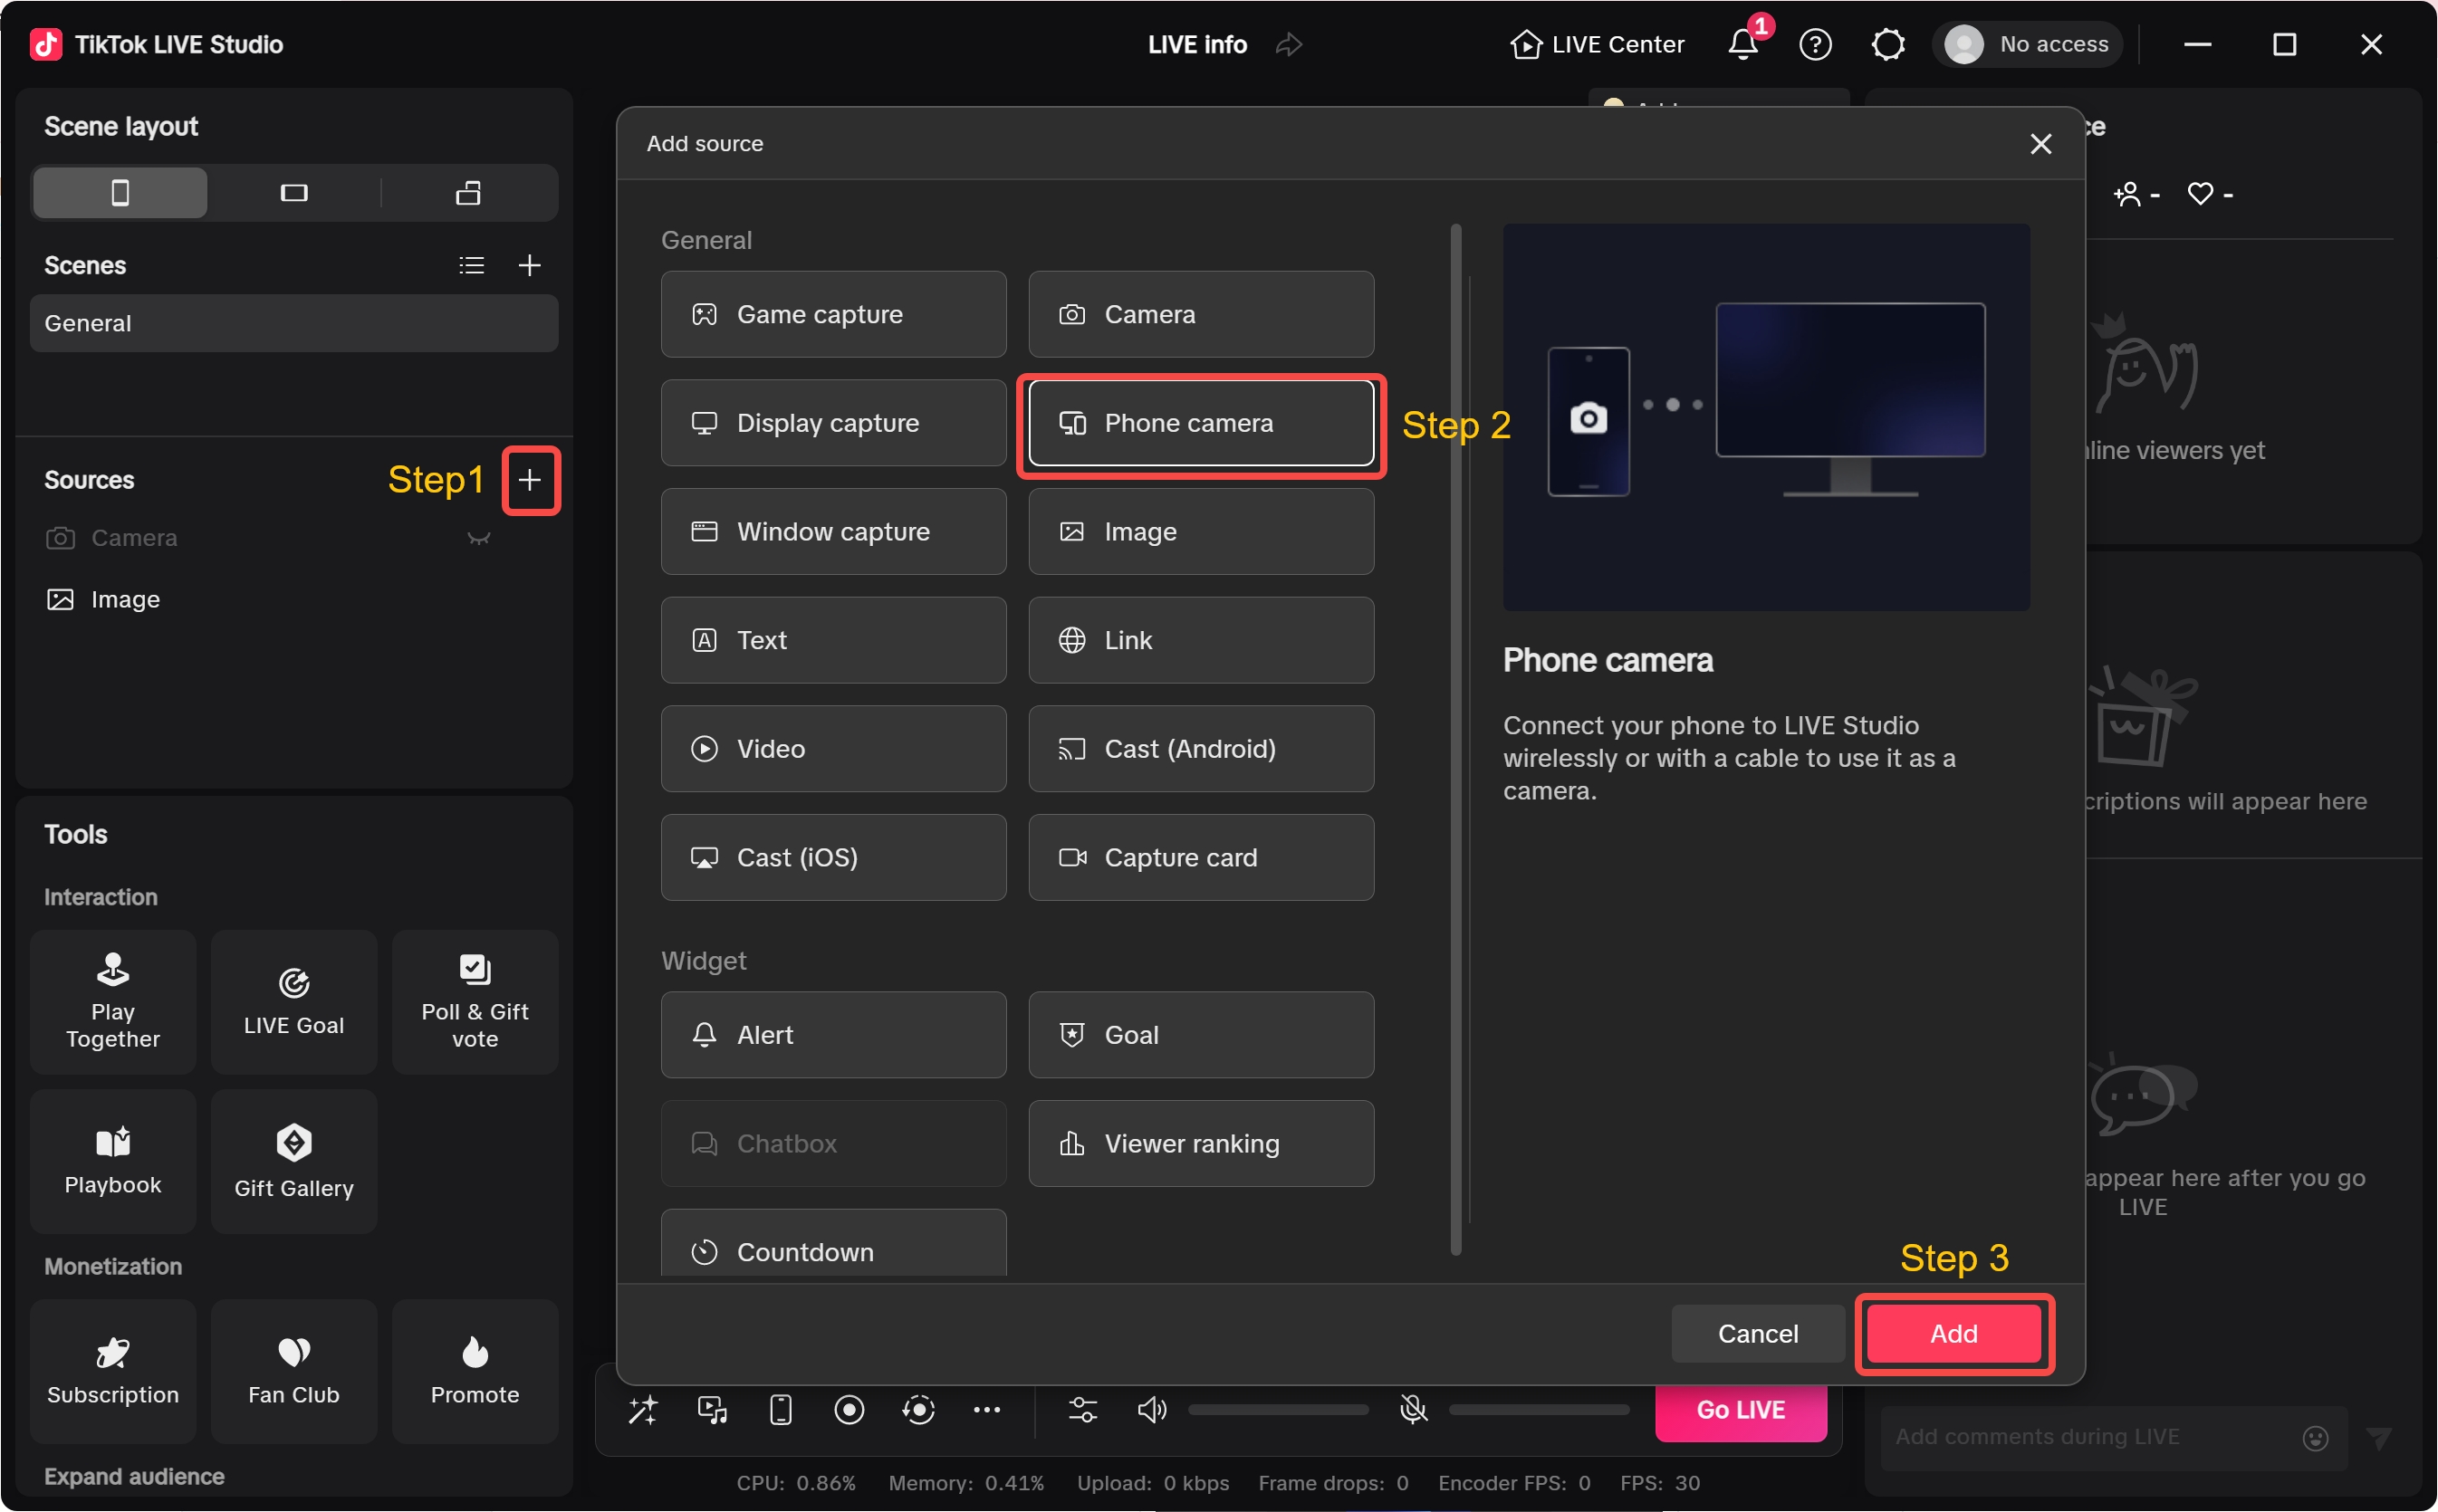
How to Use a Phone Camera as a Source
If your phone camera looks better than your spare webcam, or if mounting a phone is easier for overhead shots, the phone camera source is a practical option.
A good use case is an overhead desk shot for crafts, repairs, keyboard demos, or product handling. Another is a close-up angle when you need sharper detail than a standard webcam can provide.
The setup is easiest when you treat it as a short checklist:
- Add the
Phone camerasource in the scene where you want it to appear. - Confirm the phone view appears in the canvas before adjusting the rest of the layout.
- Decide whether that phone shot should live in its own dedicated scene or inside a combined layout.
- Mount the phone securely and lock the angle before going live.
- Check orientation, crop, and framing with the actual object or desk area you plan to show.
If the shot is meant for detail work, it usually performs better as its own dedicated scene instead of sharing the frame with your main camera. That gives the phone image more room and avoids making small objects too hard to see.
One more practical rule helps a lot: test the exact shot you plan to use, not just the camera connection. A phone camera that technically connects but points at the wrong area, rotates unexpectedly, or crops too tightly is not actually ready for a live demonstration.
A Practical Two-Angle Workflow
A beginner-friendly two-angle stream usually follows a simple pattern:
- Start in the main camera scene for your greeting and setup.
- Switch to the secondary scene when you demonstrate, unbox, or show details.
- Return to the main camera when you explain results, answer chat, or transition to the next segment.
This rhythm works because viewers always understand what they are supposed to watch. The main camera is for connection. The secondary angle is for clarity.
If you try to show both ideas at once without a clear reason, the stream can feel crowded. If you switch with intention, the stream feels guided.
How to Test the Setup Before Going Live
Before you start a real stream, do one short rehearsal with both angles active. The goal is not perfection. The goal is confirming that each camera is stable, readable, and doing the job you expect.
During that rehearsal, check:
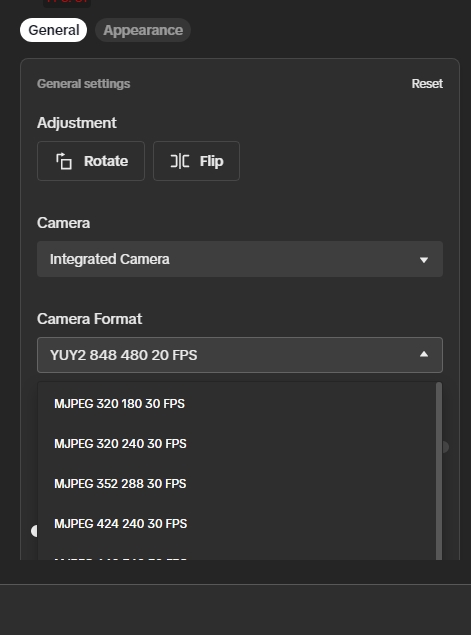
- whether the correct camera device is selected
- whether orientation and camera format look right
- whether the main and secondary scenes have matching color and brightness
- whether small objects are still readable in the phone shot
- whether switching between the two scenes feels natural for your content flow
Keep scene names short and obvious, and keep one angle as the default home base. If you later want faster switching, hotkeys can help, but the real priority in this article is making sure the camera structure itself is clean first.
A dual camera stream does not have to be complex. It just needs a repeatable setup that still makes sense when you are live and busy.
Summary
Building a dual camera setup in TikTok LIVE Studio is mostly a workflow problem, not a hardware problem. If you create clear scenes, add the right camera source, and use your phone camera only when it serves a real purpose, the result is much easier to manage and much better for viewers.
Once this workflow feels natural, the next layer is operating your stream more smoothly with preview, recording, chat management, and hotkeys.